Learning goals
By the end, you can…
Recognise calls
Name a function call and its argument.
Write functions
Define and call your own function with def.
Explain values
Explain parameters, returned values, and inside-only names (local variables).
Visit positions
Use range(8) to visit pixel positions 0 through 7.
Trace loops
Follow the order of a small nested loop.
Build safely
Test the RGB module first, then add the knob layer for Pixel Pet.
Today’s route
Call → define → loop → light → build the pet
and arguments
functions
for, range,positions 0-7
then Pixel Pet
First learn the pattern in small code. Then use it with live hardware.
Familiar calls
A call uses parentheses to do a job now
Watch and discuss · Name the function and the argument
print("Ready")
sleep_ms(500)
print("Go!")
Function name
The useful name before the parentheses, such as print.
Argument
The value inside the parentheses, such as "Ready" or 500.
Today the timing tools are supplied. Your job is to recognise what each call asks Python to do.
Define, then call
def gives a repeated job a new name
Try in Thonny · Type this smaller example and run it
def cheer():
    print("Go, Pico!")

cheer()
cheer()
def cheer():
Defines the job and gives it the name cheer.
cheer()
Calls the job. The body runs only when Python reaches the call.
One name can replace many repeated lines.
Parameters and colour data
One grouped RGB value can be passed into a function
Try in Thonny · Print the grouped value before we use hardware
GREEN = (0, 30, 0)

def show_colour(colour):
    print("Colour:", colour)

show_colour(GREEN)
Workshop RGB tuple
(red, green, blue) is one grouped colour value for this workshop.
Parameter and argument
colour is the parameter. GREEN is the argument sent into the call.
Keep RGB numbers low, such as 30, so the pixels are bright enough to see without glare.
Return versus print
print shows a value; return hands it back
Watch and discuss · Which line helps later code make a decision?
def doubled(number):
    return number * 2

print(doubled(4))
answer = doubled(4)
print(...)
Displays a value now.
return ...
Sends a value back so other code can store it, compare it, or pass it on.
If a function only prints a colour, another function cannot use that colour to choose an animation.
Inside-only names
A local variable exists only during that function call
Watch and discuss · Which name disappears after the call ends?
def make_blue():
    intensity = 25
    return (0, 0, intensity)
| Name | What it means here |
|---|---|
make_blue | the function name |
intensity | a local variable used only inside this call |
Outside the function, Python can use the returned tuple. It cannot use the inside-only name intensity.
A for loop
range(8) produces 0 through 7
Try in Thonny · Predict all eight lines before you press Run
for index in range(8):
    print(index)
range(8)
Creates the counting values 0, 1, 2, 3, 4, 5, 6, 7.
Loop body
The indented line runs once for each value, with index holding the current value.
An index is a position number. Our eight pixels use index positions 0 through 7.
Pixel positions
Valid indexes on this module are 0 through 7
On paper · Mark the first position, the last position, and the one that is out of range
pixels[0]
pixels[1]
pixels[2]
pixels[3]
pixels[4]
pixels[5]
pixels[6]
pixels[7]
for index in range(8):
    pixels[index] = (0, 0, 20)
Predict: pixels[8] asks for a ninth position that this module does not have.
Nested loops
For each outer turn, the inner loop finishes completely
On paper · Trace the order before anyone runs it
for lap in range(2):
    for colour in ["red", "green"]:
        print(lap, colour)
| Step | lap | colour |
|---|---|---|
| 1 | 0 | red |
| 2 | 0 | green |
| 3 | 1 | red |
| 4 | 1 | green |
This is the same pattern you will see at the end of 02_pixel_functions.py, just with a smaller trace.
Build while unplugged · Task 1
8-RGB module on GP16
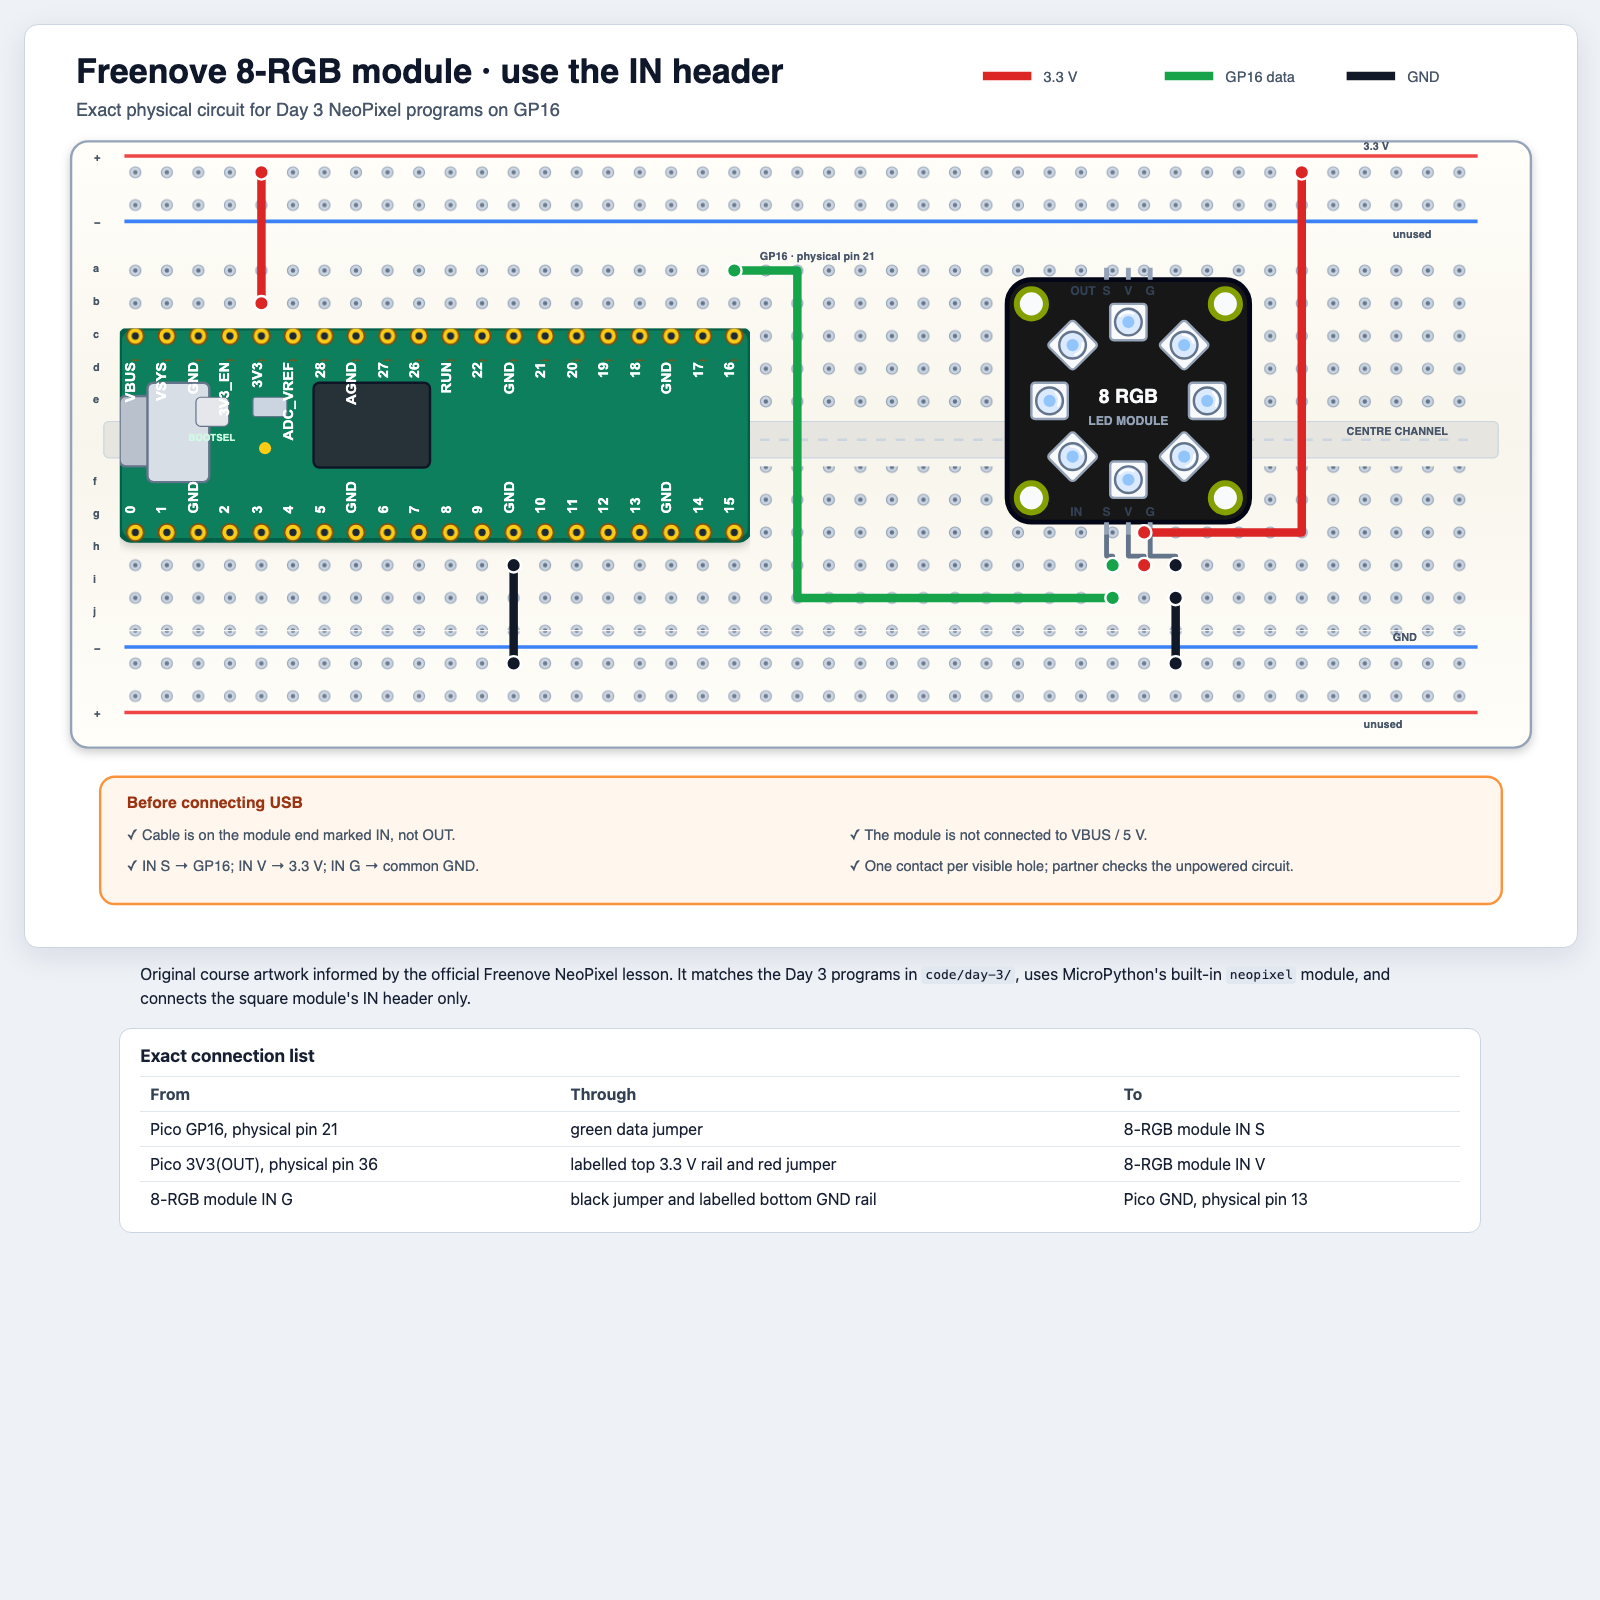
Test the RGB module · Task 1
Reconnect and run the colour file
Test the circuit · Run the smallest check before changing any code
Run
- Reconnect only after the partner check.
- Watch for red, green, blue, amber, then off.
- Read each printed tuple aloud as it appears.
RED = (30, 0, 0)
GREEN = (0, 30, 0)
BLUE = (0, 0, 30)
AMBER = (20, 10, 0)
An RGB tuple groups one colour as (red, green, blue). Amber mixes red and green. Stop this test and unplug again before the next build.
See reuse in working code
02_pixel_functions.py names three jobs clearly
Try in Thonny · Run the file, then answer the prompts
def show_colour(colour):
    pixels.fill(colour)
    pixels.write()

def chase(colour, delay_ms):
    for index in range(PIXEL_COUNT):
        ...

def level_to_colour(percent):
    ...
Find and explain
- a function with one parameter;
- the function with two parameters;
- the returned colour value;
- the nested loops at the end.
Big idea
Returning a colour is more reusable than printing a colour because later code can still use the value.
Open 02_pixel_functions.py and match each function name to its one job.
Build while unplugged · Task 2
Keep the RGB base, then add the potentiometer
RGB base diagram + table
| Potentiometer pin | Connection |
|---|---|
3V3 outer pin | the same powered 3.3 V rail as RGB IN V |
centre WIPER | GP26 / ADC0 |
GND outer pin | the same common GND rail as RGB IN G |
Stop the RGB test, unplug USB, keep its three working wires, add these three knob wires, then partner-check all six connections.
Open the starter
First read the knob and choose a state
Test the circuit · Open 03_pixel_pet_starter.py
Already supplied
pixelsandknobare already created.- The endless loop already reads, prints, and chooses a state.
- The
finallyblock already turns the pixels off safely.
Complete these first
- In
read_energy_percent(), briefly printraw_valueand turn the knob to confirm changing numbers, then return 0-100. - In
choose_state(), return"sleepy","curious", or"excited".
Turn the knob through all three ranges. Check the printed energy and state before writing an animation.
Complete the displays
Add one state animation at a time
Try in Thonny · Test each function before adding the next
0-32%
sleepy
slow blue pulse
33-65%
curious
green moving pixel
66-100%
excited
quick colourful sparkle
- Complete
show_sleepy()and test it directly. - Complete
show_curious()using indexes 0-7 and test it. - Complete
show_excited()with low RGB values and test it. - Run the whole program and turn the knob through every range.
Exit ticket
Which one can another function use?
On paper · Answer before cleanup
print(energy)
return energy
Explain the difference
One line shows a value now. The other line sends a value back so another function can make a decision with it.
Your answer: Which line lets choose_state(...) use the value?
Teacher reference
Teaching sequence and source materials
TEALS sequence adapted here
Unit 3 lessons 3.01-3.04: built-in function calls and arguments, user-defined functions, return versus print, and local scope.
Unit 4 lessons 4.01-4.03: for loops, range, indexes, and nested-loop tracing.
Workshop sources used here
day-3-make-it-reusable.md, WIRING_AND_SAFETY.md, rgb8-module.html, rgb8-module.png, 01_neopixel_colours.py, 02_pixel_functions.py, and 03_pixel_pet_starter.py.
TEALS source repositories: Unit 3 slide decks and Unit 4 slide decks.