Learning goals
By the end, you can…
Sort values
Tell the difference between whole-number, decimal, and Boolean values.
Cast a value
Use int(...) to turn a calculated decimal into a whole number.
Read a question
Explain how a comparison becomes True or False.
Choose a path
Use if, elif, and else for different outcomes.
Remember results
Store several reaction times in a list with append, len, and min.
Stop a loop on purpose
Use while conditions that end when the state changes.
Today’s route
Numbers → questions → choices → circuits → game
casting
and comparisons
not andactive-low input
and two builds
for the game
Each circuit appears right before you need to build or test it.
Kinds of values
Whole numbers and decimal numbers do different jobs
Watch and discuss · Say what each line stores
raw_value = 32768
fraction = raw_value / 65535

print(type(raw_value))
print(type(fraction))
int
A whole number such as 32768. Useful for counts, pin numbers, and many sensor readings.
float
A number with a decimal part, such as the result of dividing one number by another.
Casting
Sometimes you want a new value of a different type
Try in Thonny · Run the lines and inspect each result
raw_value = 32768
fraction = raw_value / 65535
percent = int(fraction * 100)

print(fraction)
print(percent)
print(type(percent))
Casting means asking Python to make a new value in a different form. Here int(...) drops the decimal part.
Boolean values
A comparison asks a question with one of two answers
Try in Thonny · Predict before pressing Run
score = 347

print(score < 350)
print(score >= 350)
print(score == 347)
True
The question is correct.
False
The question is not correct.
Comparison
<, >=, and == compare values and produce a Boolean answer.
A common mix-up
= stores a value; == asks whether two values match
Watch and discuss · Read each line aloud in words
| Code | Read it as… | Job |
|---|---|---|
reaction_ms = 412 | “Store 412 in reaction_ms.” | Assignment |
reaction_ms == 412 | “Is reaction_ms equal to 412?” | Comparison |
reaction_ms != 412 | “Is reaction_ms different from 412?” | Comparison |
Use = to store. Use == to ask “equal?” and != to ask “different?”
not and active-low input
The button event makes the electrical value low
On paper · Fill in the last column before checking
| Physical state | button.value() | not button.value() | Meaning we want |
|---|---|---|---|
| Released | 1 | False | not pressed |
| Pressed | 0 | True | pressed |
Active-low means the important event makes the signal low. not turns that electrical reading into a natural Python answer.
Choosing a branch
if, elif, and else choose one path
Watch and discuss · Which branch runs at 10%, 45%, and 92%?
if percent < 20:
    led.duty_u16(0)
elif percent <= 70:
    led.duty_u16(20000)
else:
    led.duty_u16(65535)
Python checks from top to bottom and runs only the first branch whose condition is True.
Build while unplugged · Task 1
Button input and LED output
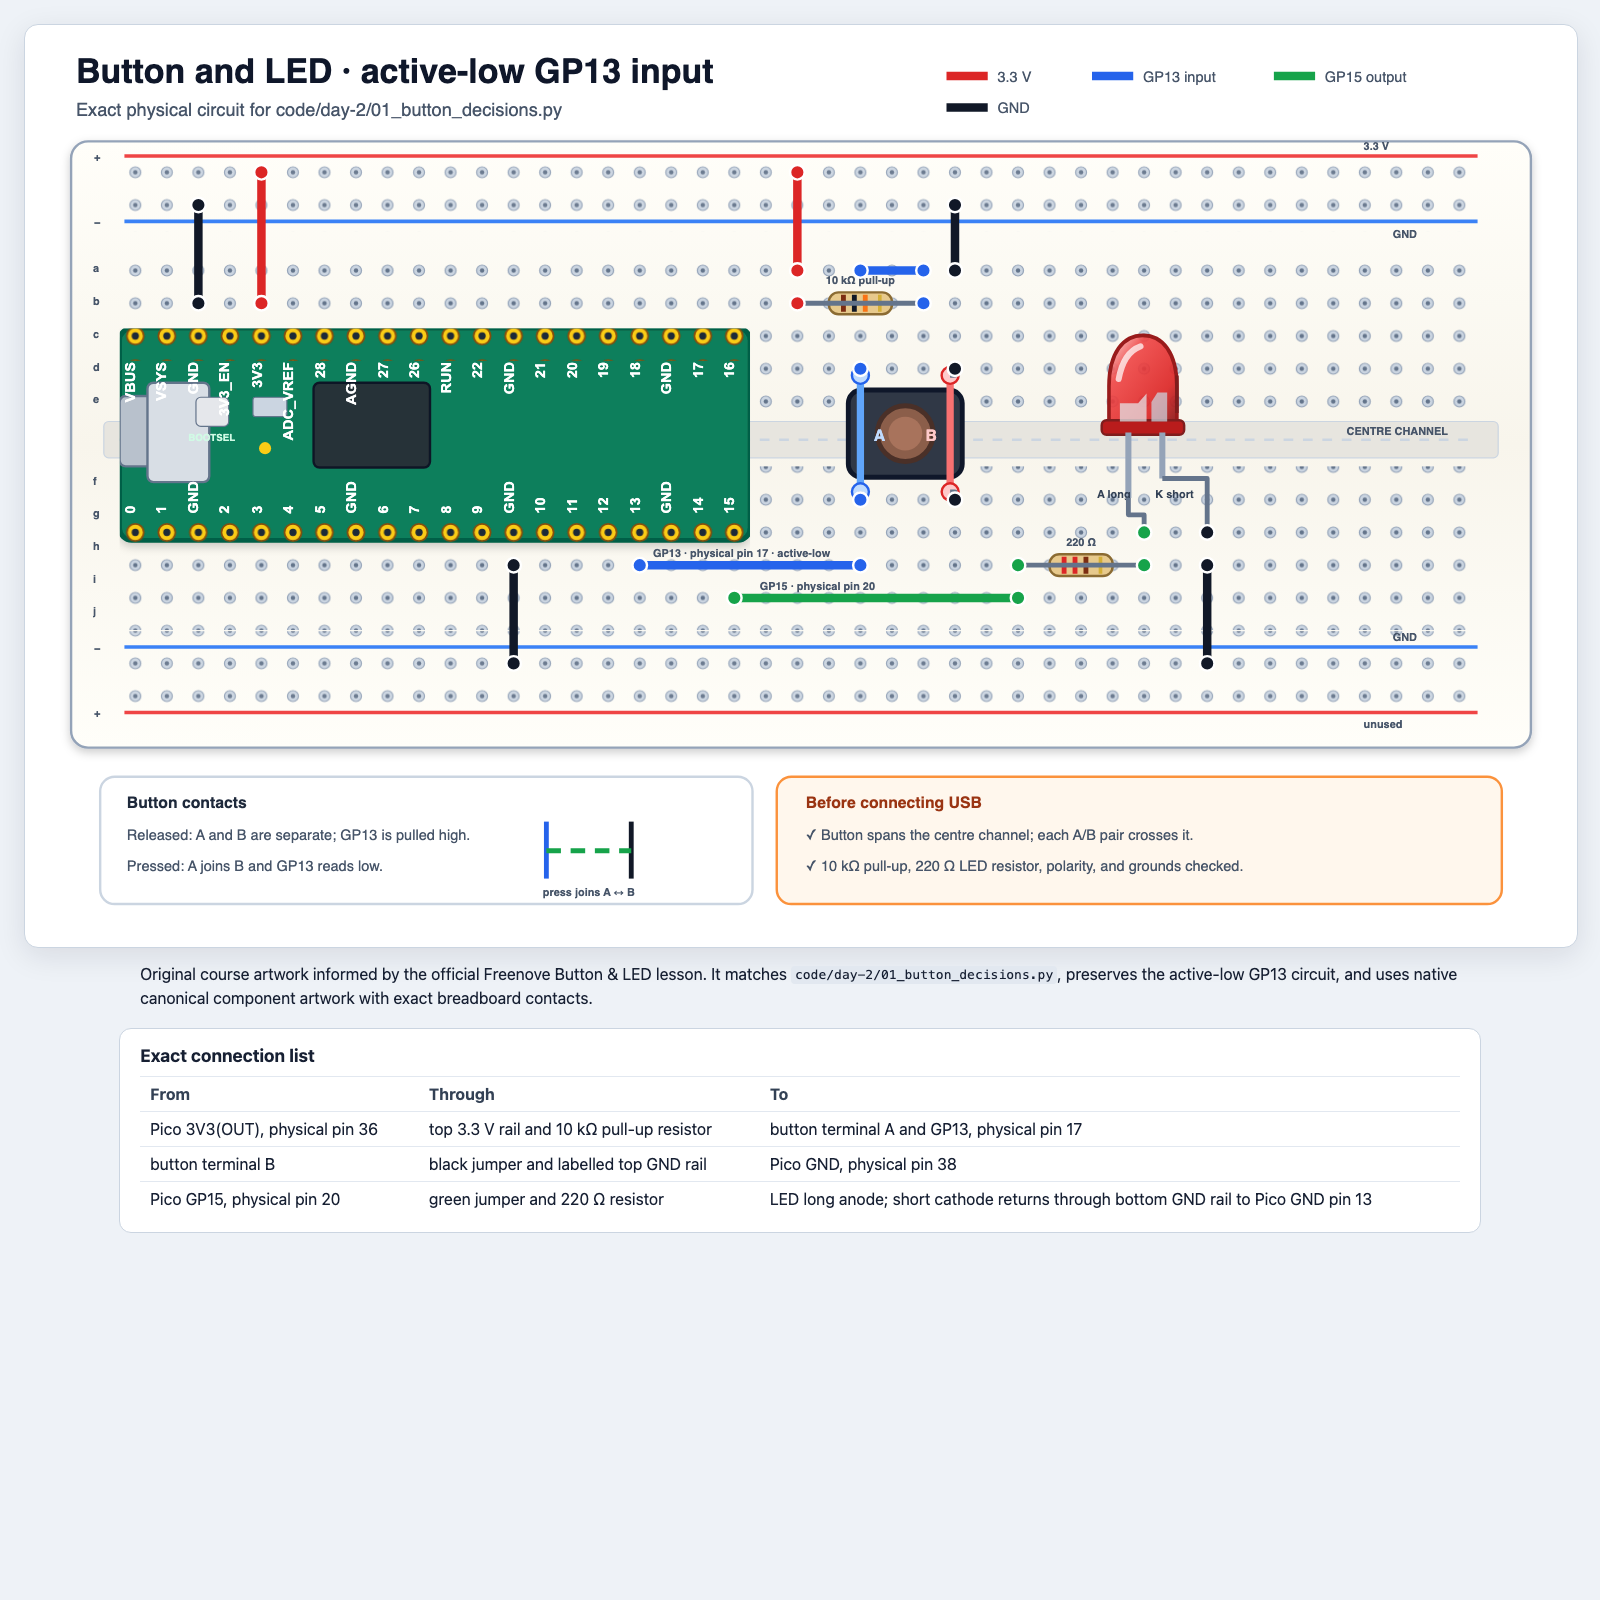
Run the button program
Test the question with light
Test the circuit · Reconnect only after the partner check
Open and run
pressed = not button.value()

if pressed:
    led.on()
else:
    led.off()
What you should observe
- Released button: LED off.
- Press and hold: LED on and the Shell prints
Pressed: True. - Press Stop or
Ctrl+C: the LED turns off.
If the program behaves as if the button is always pressed, unplug USB and check the button orientation and the 10 kΩ pull-up before changing code.
Build while unplugged · Task 2
Potentiometer on GP26, LED on GP15
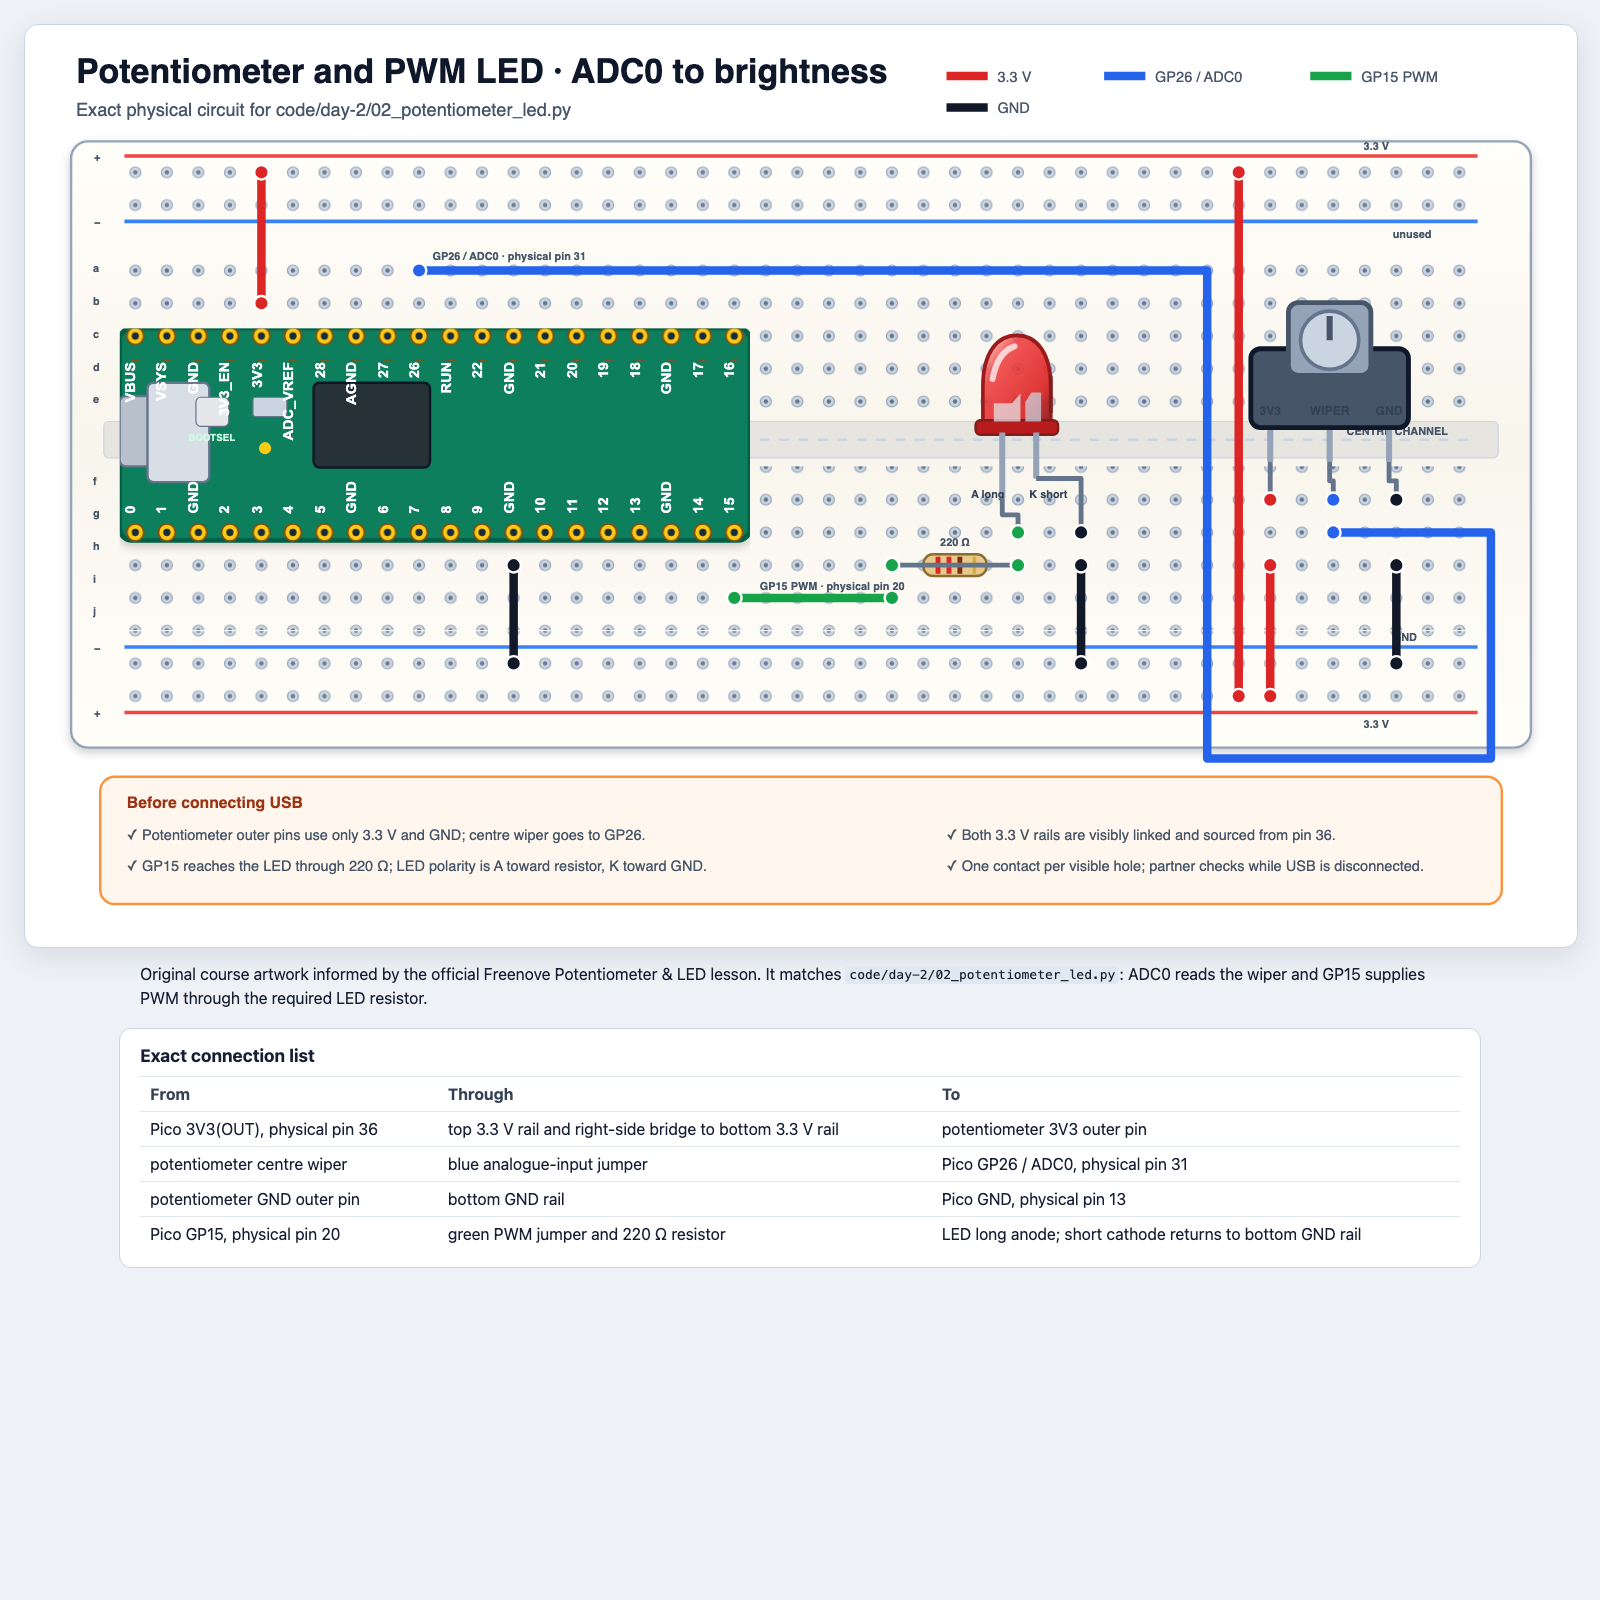
Read the knob
Test the circuit and collect real values
Test the circuit · Turn the shaft slowly from one end to the other
Record
Find readings close to 0%, 25%, 50%, 75%, and 100%. The LED should fade smoothly as the numbers change.
Your measured values do not need to be exact. The important pattern is low knob position → small number, high knob position → large number.
Choose brightness zones
Write three brightness zones
Try in Thonny · Edit the same file and test each zone
Add this branch
if percent < 20:
    led.duty_u16(0)
elif percent <= 70:
    led.duty_u16(20000)
else:
    led.duty_u16(65535)
Concrete test order
- Turn the knob near 0% and confirm the LED is off.
- Turn near the middle and confirm the LED is dim.
- Turn near the top and confirm the LED is bright.
Lists
One list can keep several reaction times
Try in Thonny · Run each line and explain the result
times = [410, 375, 522]
print(times[0])
times.append(330)
print(len(times))
print(min(times))
print(times[-1])
Index
times[0] asks for the first item.
Append
append adds one new result at the end.
len
len(times) counts how many results are stored.
min
The workshop adds this built-in tool today to find the fastest score.
Conditional while
Each loop needs an exit condition you can name
On paper · Match each loop to the moment it stops
| Loop | Read it as… | Stops when… |
|---|---|---|
while len(scores) < ROUNDS: | repeat while we still need more scores | the list already holds ROUNDS results |
while not button.value(): | wait while the button is pressed | the button is released |
while button.value(): | wait while the button is released | the button is pressed |
These loops stop because the condition changes. You do not need an endless loop for every job.
Reaction game circuit reminder
Reuse the same button-and-LED circuit
Build while unplugged · Rebuild only if you took the circuit apart
Keep the same wiring
- GP13 reads the button.
- 10 kΩ pull-up connects GP13 to 3.3 V.
- GP15 drives the LED through 220 Ω.
- Use the exact diagram and table.
Plan the game first
Put one round in order before you type it
On paper · Number the steps from first to last
Open
The imports, pin setup, scores = [], and LED cleanup are already supplied.
One round, in order
- Wait until the button is released.
- Wait a random number of milliseconds.
- Turn on the LED and record the start time.
- Wait until the button is pressed.
- Calculate
reaction_msand turn the LED off. - Add the result to
scores. - Print a message for the result.
Build the starter
Replace pass with working game logic
Try in Thonny · Get one round working before you add all three
Write these parts
- Inside
try:, deletepass. - Write one working round using the two button waits.
- Add
scores.append(reaction_ms). - Add
if reaction_ms < 350→Quick!, elseKeep practising!. - Wrap the round in
while len(scores) < ROUNDS:.
Use the supplied tools as written
wait_ms = randint(1000, 3000)
sleep_ms(wait_ms)
start_ms = ticks_ms()
end_ms = ticks_ms()
reaction_ms = ticks_diff(end_ms, start_ms)
The timing tools and the try/except/finally cleanup are already provided. Today you focus on the game logic inside them.
Check the result
Test the game with evidence you can show
Test the circuit · Run the full three-round version
Your program should show
- The LED waits, then turns on.
- A button press creates one whole-number reaction time.
- Each round prints either
Quick!orKeep practising!. - After three rounds, the Shell prints the full list and the fastest score with
min(scores).
Useful checks if something looks wrong
- If the LED never turns on, print
wait_msand confirm the program is still waiting. - If the game never notices a press, test the button again with
01_button_decisions.py. - If a result looks impossible, print
start_msandreaction_msfor one round.
Exit ticket
Write one exact condition for the middle range
On paper · Answer before packing away the hardware
Write a condition that is true when reaction_ms is at least 200 and below 500. Then explain what happens exactly at 200 and exactly at 500.
Source reference
Where today’s sequence comes from
TEALS Unit 2 ideas
Types and casting, Boolean values, comparison operators, = versus ==, not, if/elif/else, lists, and while loops with clear stopping conditions.
Workshop-specific hardware tasks
Active-low button input on GP13, PWM LED on GP15, potentiometer reading on GP26 / ADC0, and the student-built reaction game starter using supplied timing and cleanup code.
Workshop links used in this deck: ../code/day-2/01_button_decisions.py, ../code/day-2/02_potentiometer_led.py, ../code/day-2/03_reaction_game_starter.py, ../diagrams/button-and-led.html, and ../diagrams/potentiometer-and-led.html.