Learning goals
By the end, you can…
Use Thonny’s Shell and editor for two different jobs.
Recognise strings, integers, floats, expressions, and variables.
Read errors and trace a script one line at a time.
Explain how Python changes an LED output.
Build an LED circuit safely with a resistor.
Create a recognisable light signal using named values.
Today’s route
Teach → practise → build
Python
code
light
signal
During teaching: predict before Run. During the lab: change one thing at a time.
A computing system
Input → process → output
Watch and discuss · Thonny stays closed for now
input
process
output
What is different about a physical output?
Our IDE
Find the Files, Editor, and Shell
Do now · Open Thonny and follow along
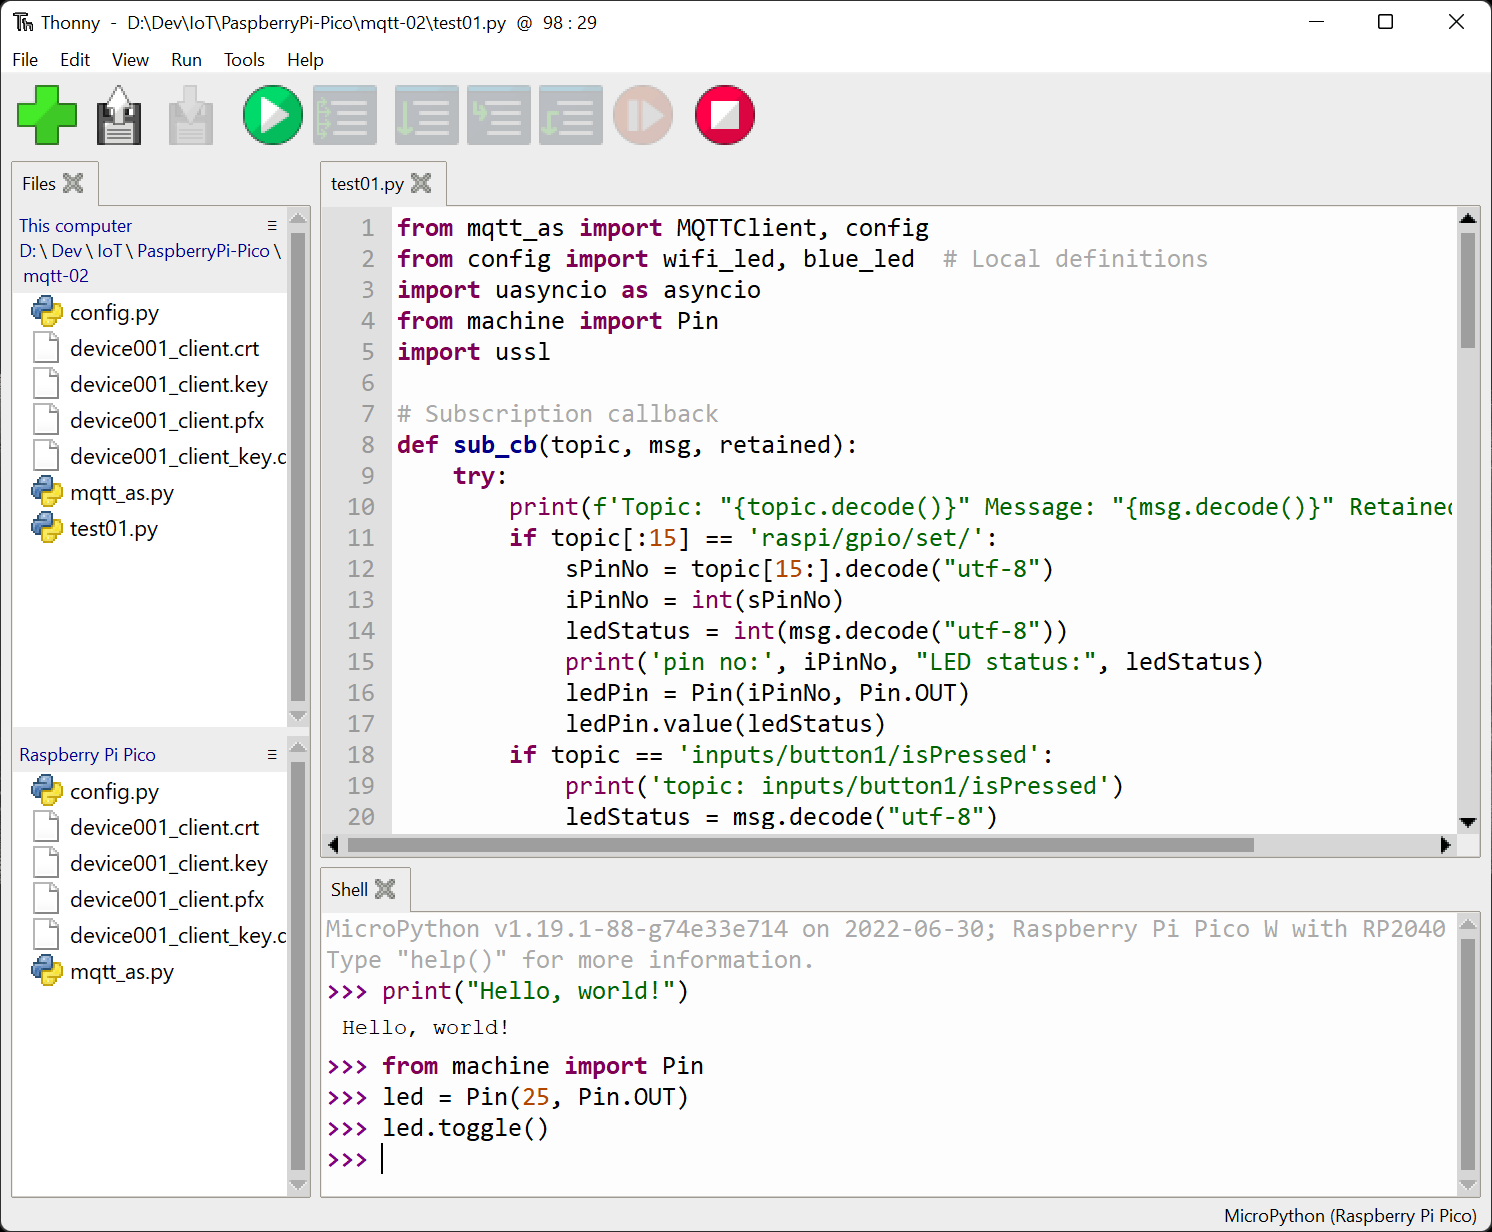
Files
Choose a saved program on this computer or the Pico.
Editor
Write, change, and save a complete program.
Shell
Try one line now and read program output or errors.
Your colours and toolbar may differ, but these three areas do the same jobs.
Interactive mode
The Shell answers one line now
Try in Thonny · Type each line after predicting
>>> print("Hello, Pico!")
Hello, Pico!
>>> 2 + 3
5
>>> type(0.5)
<class 'float'>
The interpreter reads Python, evaluates it, and shows the result.
Values and types
Python asks: “What kind of value is this?”
Discuss · Keep Thonny open, but do not type yet
string
"Pico"
Text inside quotes.
integer
42
A whole number.
float
0.5
A number with a decimal point.
Why is "42" not an integer?
Expressions
An expression produces a value
Try in Thonny · Predict, then test all three
2 + 3
10 / 2
"Pi" + "co"
Think like the interpreter
- Read the values.
- Apply the operator.
- Produce one result.
Predict: Which result is a float? Which is a string?
Errors are evidence
Read the last line first
Try in Thonny · Make this typo on purpose
>>> pritn("Hello")
Traceback (most recent call last):
  File "<stdin>", line 1
NameError: name 'pritn' isn't defined
1 · Name it
NameError
2 · Locate it
Line 1
3 · Compare it
pritn versus print
Change only pritn to print, then run it again.
If it works, the misspelling caused the error.
Script mode
The editor stores a sequence
Try in Thonny · Type, save, predict, then Run
Shell
Runs one instruction immediately.
Best for a tiny experiment.
Script
Saves instructions in a .py file.
Runs from top to bottom.
print("Three...")
print("Two...")
print("One...")
print("Hello, physical world!")
The program is the instructions. The output is what happens when they run.
Read line by line
Trace before you press Run
Watch · Point to each line; do not run it yet
from machine import Pin
from time import sleep
led = Pin("LED", Pin.OUT)

print("Light on")
led.on()
sleep(1)
led.off()
print("Finished")
Screen
Which words appear?
Pico
When is the LED on?
Time
Where does it pause?
Hardware vocabulary
Three lines connect Python to the Pico
Try together · Open and Run 01_hello_pico.py
Pin
Gives Python access to a Pico pin.
"LED"
Names the onboard LED.
Pin.OUT
Says the pin sends a signal out.
from machine import Pin
led = Pin("LED", Pin.OUT)
led.on()
Today you may reuse this setup. Your job is to explain what it achieves, not reproduce it from memory.
Variables
A useful name that refers to a value
Discuss · Identify names and values before running
message = "Team Comet"
on_time = 0.15
off_time = 0.35
Left of =
The variable name.
Right of =
The value stored under that name.
Which variable changes text? Which variables change time?
Why names matter
One edit can change every use
Try in Thonny · Open 02_variable_blink.py and Run it once
on_time = 0.15

led.on()
sleep(on_time)
led.off()
Experiment
Change 0.15 to 1.5.
Predict: What changes? What stays unchanged?
sleep(on_time) uses the value stored in on_time.
Change that value once, and all three ON pauses change.
Comments
Notes for humans, ignored by Python
Discuss · Which comment helps a reader more?
# First group: three short flashes
led.on()
sleep(short_flash)
led.off()
Useful comment
Explains the intention: what does this block mean?
Not useful
# turn LED on merely repeats led.on().
Safety gate
Unplug → build → partner-check → power
Get ready to build · Stop the program and unplug USB
Before touching wires
Stop the program and disconnect USB.
One contact per hole
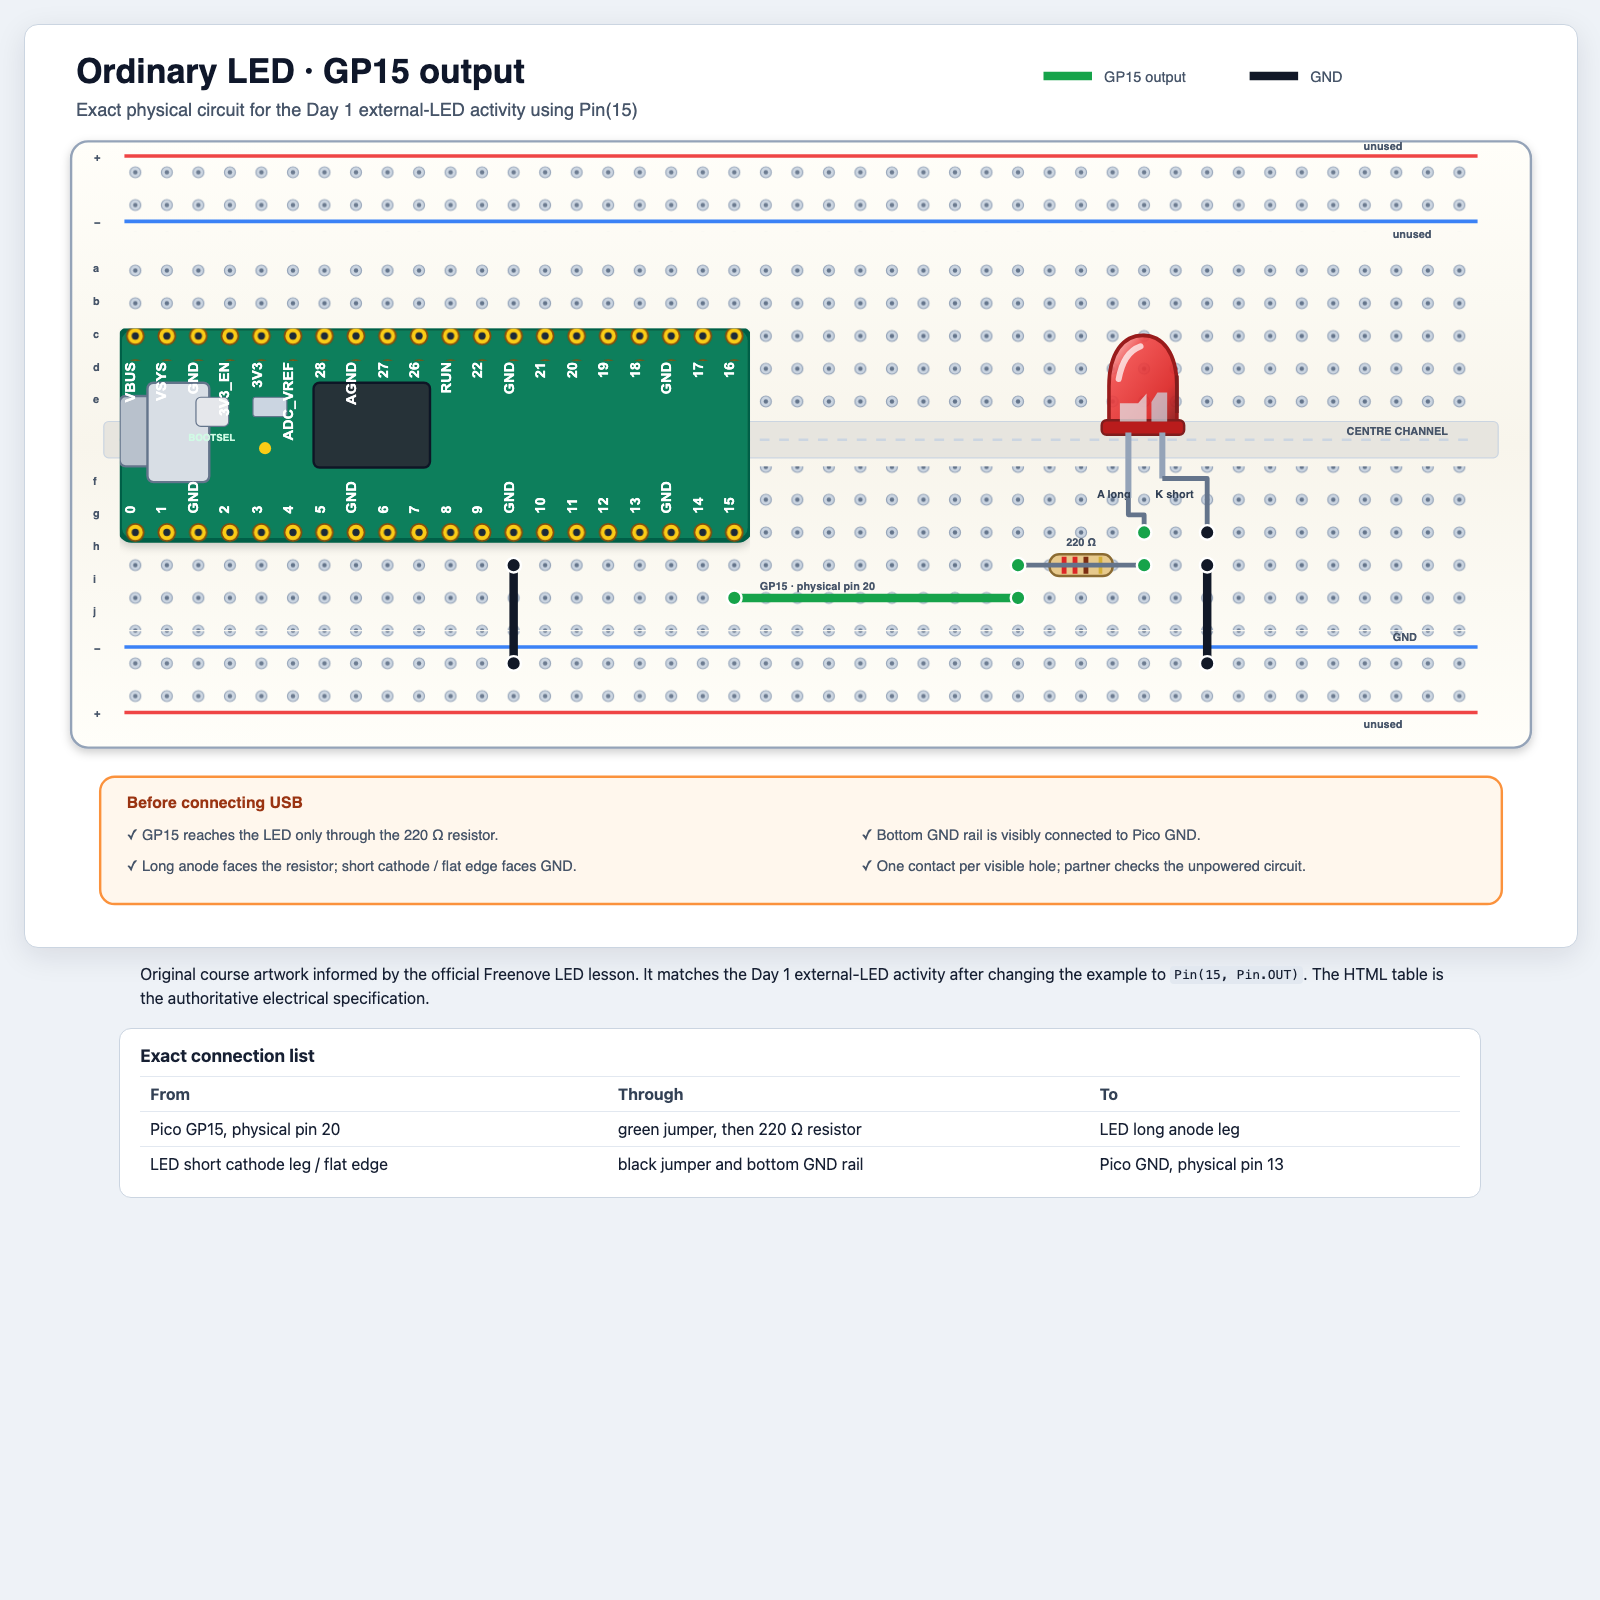
Every coloured endpoint dot represents one real breadboard hole.
Use the resistor
GP15 must reach the ordinary LED through 220 Ω.
Check orientation
Long leg/anode toward the resistor; short leg/flat edge toward GND.
Never connect a GPIO directly to GND. Stop if anything becomes hot.
Ordinary LED · GP15
Follow the route, not just the colour
What ON and OFF mean
Why the LED lights
Discuss · Trace the complete circuit
led.on()GP15 becomes 3.3 V
resistor protects LED
then current reaches GND
led.off()GP15 becomes 0 V
current stops
In the copied program, change only
Pin("LED", Pin.OUT) to Pin(15, Pin.OUT).
Debugging physical systems
Code, circuit, or assumption?
Discuss · Choose one exact check for each column
Code
Wrong pin? Misspelled name? Program still running?
Circuit
LED reversed? Wire one row away? Missing resistor?
Assumption
Did we predict the wrong output or inspect the wrong LED?
If the external LED stays dark: first run the known-working onboard-LED file. If that works, run the supplied GP15 ON/OFF test. If GP15 still does not light the LED, stop, unplug USB, and check the circuit against the diagram.
Your build
Create a message made of light
Must include
- a printed team name;
- short and long flashes;
- at least two timing variables;
- a clear pause between groups of flashes;
- a final
offstate.
Build it in this order
- Run the starter: check its one short flash.
- Add two short flashes to finish the first group.
- Change
short_flash; check all three. - Add a pause, then a group using
long_flash. - Hide the code and ask a partner to decode it.
Start with
03_secret_signal_starter.py.
Do not open the solution until your own signal works.
Exit ticket
Complete the explanation
“When Python runs led.on(), the output is ________,
and when Python runs print(), the output is ________.”
What evidence today changed how you think code works?
Teacher reference
Teaching sequence and sources
Adapted teaching sequence
TEALS Unit 1 lessons 1.01–1.05: IDE, interpreter, values and types, expressions, scripts, variables, comments, and debugging.
Physical-computing adaptation
Thonny with MicroPython, onboard LED, GP15 ordinary LED circuit, and the Secret Signal Machine lab.
Source curriculum: TEALS Introduction to Computer Science, Unit 1 slide decks . Course circuit artwork is original and documented in the workshop source notes.